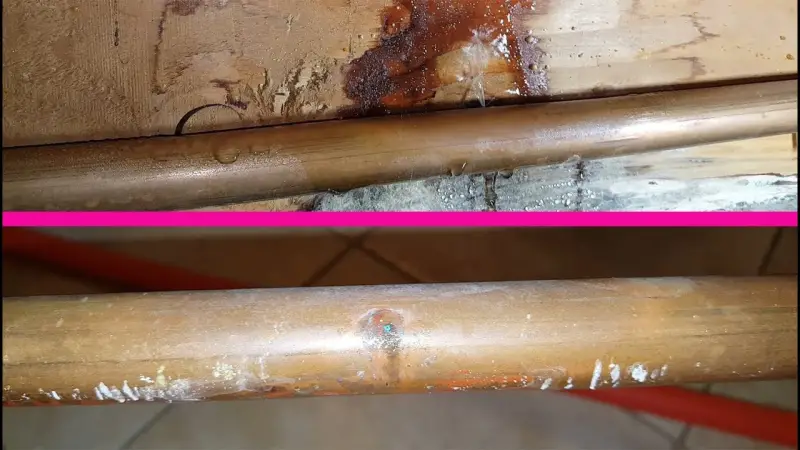
A pinhole leak in a copper pipe can be a frustrating and concerning issue for any homeowner. Not only does it waste water, but it can also cause significant damage if left unchecked. The good news is that fixing a pinhole leak in a copper pipe is a relatively simple DIY task that can be done with just a few tools and materials.
To fix a pinhole leak in a copper pipe, the first step is to turn off the water supply to the affected area. Next, locate the leak and dry the area around it. If the leak is small, a simple solution is to apply plumbing tape, also known as “pipe dope,” around the leak. This will create a water-tight seal and prevent further water from escaping.
If the leak is more significant or the pipe is otherwise damaged, you may need to replace the section of the pipe that is affected. To do this, you will need to cut out the damaged section of the pipe and replace it with a new section of copper pipe. Be sure to use fittings and a coupling to securely connect the new section of pipe to the existing pipes. This will ensure that the repair is strong and reliable. It’s important to tighten the fittings securely but not over tighten, as this can cause more damage to the pipes. With these steps, you can effectively fix a pinhole leak in a copper pipe and prevent further water damage.
How To Fix Pinhole Leaks In Copper Pipes Overview
The first step in fixing a pinhole leak is to locate the leak and turn off the water supply to the affected area. This is a crucial step, as it will prevent further water damage while you make the repair. Next, dry the area around the leak and assess the extent of the damage. If the leak is small, you can use plumbing tape, also known as “pipe dope”, to create a water-tight seal around the leak. Simply wrap the tape around the leak and press it into place. This is a simple and cost-effective solution that can be done quickly and easily.
If the leak is more significant or the pipe is otherwise damaged, you may need to replace the section of the pipe that is affected. To do this, you will need to cut out the damaged section of the pipe and replace it with a new section of copper pipe. The fittings and coupling you use to connect the new section of pipe to the existing pipes are very important. Make sure you use quality fittings and tighten them securely, but not too tightly, to ensure a strong and reliable repair.
I’m so impressed with the variety of products available for fixing pinhole leaks in copper pipes. You can find plumbing tape, fittings, and couplings at your local hardware store or online. There are also a variety of tools you can use, such as a hacksaw or a pipe cutter, to make the job easier and more efficient. With these tools and materials, you’ll be able to fix that pinhole leak in no time!
In conclusion, fixing a pinhole leak in a copper pipe is a simple and cost-effective DIY project that can save you a lot of money and prevent further damage to your home. I’m so excited to share my knowledge and experience with you, and I hope you found this guide helpful. Good luck with your project, and happy fixing!
How To Fix Pinhole Leaks In Copper Pipes – Methods in Comparison
- Applying Plumbing Tape: Plumbing tape, also known as “pipe dope”, is a simple and cost-effective solution for small pinhole leaks in copper pipes. The tape is wrapped around the leak and pressed into place to create a water-tight seal. This method is quick and easy, and can be done with just a few tools. Plumbing tape is a versatile and durable solution that is suitable for a variety of pipe sizes and materials.
- Replacing the Damaged Section of the Pipe: If the leak is more significant or the pipe is otherwise damaged, you may need to replace the section of the pipe that is affected. To do this, you will need to cut out the damaged section of the pipe and replace it with a new section of copper pipe. You will also need to use fittings and a coupling to securely connect the new section of pipe to the existing pipes. This method is more involved and requires more tools, but it provides a stronger and more reliable repair that will last for many years.
| Method | Benefits | Drawbacks |
|---|---|---|
| Applying Plumbing Tape | Quick and easy to apply | Only suitable for small leaks |
| Replacing the Damaged Section of the Pipe | Strong and reliable repair | More involved and requires more tools |
In conclusion, the best method for fixing a pinhole leak in a copper pipe depends on the extent of the damage and the size of the leak. If the leak is small, applying plumbing tape is a quick and easy solution. If the leak is more significant or the pipe is otherwise damaged, replacing the damaged section of the pipe provides a stronger and more reliable repair.
Equipment for Eliminating Leaks in Copper Pipes
| Equipment | Purpose |
|---|---|
| Plumbing tape (pipe dope) | To create a water-tight seal around the leak |
| Hacksaw or pipe cutter | To cut the damaged section of the pipe |
| Fittings and coupling | To securely connect the new section of pipe to the existing pipes |
| Adjustable wrench or pliers | To tighten the fittings and coupling |
| Rags or towels | To dry the area around the leak |
| Measuring tape | To measure the length of the new section of pipe |
This list is not exhaustive, as the specific tools you need may vary depending on the extent of the damage and the size of the leak. However, these are the basic tools you will need to get started with fixing a pinhole leak in a copper pipe.
Step Instruction on How to Fix Pinhole Leaks in Copper Pipes
- Turn off the Water Supply: The first step in fixing a pinhole leak in a copper pipe is to turn off the water supply to the affected area. This will prevent water from leaking out while you make the repair.
- Dry the Area Around the Leak: Use rags or towels to dry the area around the leak so you can clearly see the extent of the damage.
- Determine the Extent of the Damage: If the leak is small, you may be able to repair it with plumbing tape. If the leak is more significant or the pipe is otherwise damaged, you will need to replace the damaged section of the pipe.
- Apply Plumbing Tape (For Small Leaks): If the leak is small, wrap the plumbing tape around the leak and press it into place to create a water-tight seal. Repeat the process until you have completely covered the leak.
- Replace the Damaged Section of the Pipe (For Large Leaks): If the leak is more significant, use a hacksaw or pipe cutter to cut out the damaged section of the pipe. Measure the length of the new section of pipe you will need and cut it to size. Use fittings and a coupling to securely connect the new section of pipe to the existing pipes. Use an adjustable wrench or pliers to tighten the fittings and coupling.
- Turn on the Water Supply: Once the repair is complete, turn the water supply back on and check for leaks. If there are no leaks, you have successfully fixed the pinhole leak in the copper pipe.
Remember to always take safety precautions when working with pipes, such as wearing gloves and protective eye wear. If you are unsure about how to make the repair, consider hiring a professional plumber to do the job for you.

F.A.Q.
F.A.Q.
Plumbing tape is a quick and easy solution for small pinhole leaks in copper pipes. However, if the leak is more significant or the pipe is otherwise damaged, you may need to replace the damaged section of the pipe.
What is the best type of plumbing tape to use for fixing pinhole leaks in copper pipes?
There are many types of plumbing tape available, and the best one for you will depend on your specific needs and the size of the leak. Look for a tape that is designed for use with copper pipes and is suitable for the size of the leak.
Leave a Reply