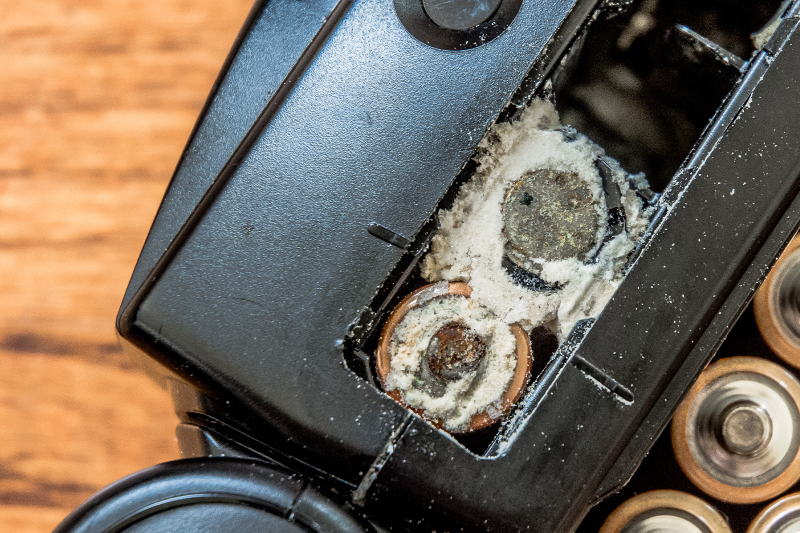
Battery corrosion can be a frustrating problem for toy owners, as it can lead to malfunctioning toys and a stained exterior. But don’t worry, cleaning battery corrosion is a simple and straightforward process that can be done with household items. With a few basic steps, you can have your toys back in working condition in no time.
To clean battery corrosion, you will need a few materials. These include white vinegar, baking soda, a toothbrush or cotton swabs, and some aluminum foil. First, remove the batteries from the toy and any visible corrosion from around the battery compartment. Next, mix equal parts white vinegar and baking soda to create a cleaning solution. Dip the toothbrush or cotton swab into the solution and scrub the affected areas until the corrosion is removed. For especially stubborn spots, you can also wrap a small piece of aluminum foil around the bristles of the toothbrush and use that to scrub the corrosion.
Finally, once the corrosion has been removed, rinse the battery compartment with clean water and let it dry completely. Replace the batteries and test the toy to ensure that it is functioning properly. With these simple steps, you can quickly and easily clean battery corrosion from your toys and keep them in good working order.
Cleaning Battery Corrosion In Toys Overview
When it comes to cleaning battery corrosion, there are a few different methods you can use. One of my favorites is using a mixture of white vinegar and baking soda. The acid in the vinegar reacts with the baking soda to create a cleaning solution that can effectively remove the corrosion. Simply mix equal parts of each and use a toothbrush or cotton swab to scrub the affected areas until the corrosion is removed.
Another method I love is using aluminum foil. Simply wrap a small piece of foil around the bristles of the toothbrush and use that to scrub the corrosion. This method can be especially effective for stubborn spots.
Finally, once the corrosion is removed, be sure to rinse the battery compartment with clean water and let it dry completely. Then, simply replace the batteries and test the toy to ensure it’s functioning properly. It’s that easy!
In conclusion, cleaning battery corrosion in toys is a fun and simple process that can be done with household items. Whether you use vinegar and baking soda, aluminum foil, or another method, with a little bit of effort, you can easily clean the corrosion and get your toys back in working order. So don’t wait, grab your cleaning supplies and get started today!
Cleaning Battery Corrosion In Toys Comparison Table
When it comes to cleaning battery corrosion in toys, there are a few different ingredients you can use to create an effective cleaning solution. Each ingredient has its own strengths and weaknesses, and choosing the right one will depend on the severity of the corrosion and your personal preferences.
| Ingredient | Pros | Cons |
|---|---|---|
| White Vinegar | Effective at removing corrosion, readily available, non-toxic | Can have a strong odor |
| Baking Soda | Mild abrasiveness helps remove corrosion, non-toxic | May require a lot of scrubbing |
| Lemon Juice | Natural cleaning solution, mild acidic properties help remove corrosion | May not be as effective as other ingredients |
| Salt | Helps to remove corrosion, readily available | Can be abrasive, may not be as effective as other ingredients |
White vinegar is a popular and effective ingredient for cleaning battery corrosion in toys. Its acidic properties help to dissolve the corrosion, and it is readily available in most households. Plus, it is non-toxic, so it’s safe to use around children and pets. The only downside is that vinegar can have a strong odor, which some people may find unpleasant.
Baking soda is another ingredient that can be used to clean battery corrosion. Its mild abrasiveness helps to remove the corrosion, and it is non-toxic, making it a safe choice. However, depending on the severity of the corrosion, it may require a lot of scrubbing to achieve good results.
Lemon juice is a natural cleaning solution that can also be used to clean battery corrosion. Its mild acidic properties help to dissolve the corrosion, and it has the added bonus of a fresh lemon scent. However, it may not be as effective as other ingredients, such as vinegar or baking soda.
Salt is another ingredient that can be used to clean battery corrosion, and it is readily available in most households. Its abrasive properties can help to remove the corrosion, but it may not be as effective as other ingredients. Additionally, the salt can be abrasive and may scratch delicate surfaces, so it should be used with caution.
In conclusion, choosing the right ingredient for cleaning battery corrosion in toys will depend on the severity of the corrosion and your personal preferences. White vinegar and baking soda are both effective and safe options, while lemon juice and salt may be less effective but are still good options for mild cases of corrosion.
Equipment To Work With Cleaning Battery Corrosion In Toys
| Equipment | Purpose |
|---|---|
| Toothbrush or Cotton Swab | Used to scrub the corrosion and apply the cleaning solution |
| Aluminum Foil | Can be used in place of a toothbrush to scrub the corrosion |
| Clean Cloth | Used to dry the battery compartment once the corrosion is removed |
| Protective Gloves | Used to protect your hands from the cleaning solution |
| Plastic Spoon | Can be used to mix the cleaning solution and to remove any loose corrosion |
A toothbrush or cotton swab is an essential tool for cleaning battery corrosion in toys. The bristles of the toothbrush or the cotton tip of the swab can be used to scrub the affected areas and apply the cleaning solution.
Aluminum foil can be used in place of a toothbrush to scrub the corrosion. Simply wrap a small piece of foil around the bristles of the toothbrush or the cotton tip of the swab and use that to scrub the affected areas.
A clean cloth is important for drying the battery compartment once the corrosion is removed. Make sure to use a clean, lint-free cloth to avoid leaving any residue behind.
Protective gloves are a good idea to protect your hands from the cleaning solution. Depending on the ingredients you use, some cleaning solutions can be harsh or toxic, so it’s important to protect your skin.
A plastic spoon can be used to mix the cleaning solution and to remove any loose corrosion. Make sure to use a plastic spoon instead of a metal one, as metal can react with the cleaning solution and cause further corrosion.
In conclusion, having the right equipment on hand will make cleaning battery corrosion in toys much easier and more effective. With these essential tools, you’ll be able to remove the corrosion and get your toys back in working order in no time!
Step By Step Instruction On How To Make Cleaning Battery Corrosion In Toys
- Gather the necessary materials: You will need white vinegar, baking soda, a toothbrush or cotton swab, aluminum foil, a clean cloth, protective gloves, and a plastic spoon.
- Make the cleaning solution: Mix equal parts of white vinegar and baking soda to create a cleaning solution. Stir the solution until the baking soda has dissolved.
- Protect your hands: Put on a pair of protective gloves to protect your hands from the cleaning solution.
- Apply the cleaning solution: Using a toothbrush or cotton swab, apply the cleaning solution to the affected areas of the battery compartment. If the corrosion is particularly severe, you may want to use aluminum foil wrapped around the bristles of the toothbrush or the cotton tip of the swab to scrub the affected areas.
- Let the solution sit: Let the cleaning solution sit on the affected areas for 10-15 minutes to allow the vinegar and baking soda to dissolve the corrosion.
- Scrub the corrosion: Use the toothbrush or cotton swab to scrub the affected areas, being careful not to damage the surrounding surfaces. You may also want to use a plastic spoon to remove any loose corrosion.
- Rinse and dry: Rinse the battery compartment with clean water and dry it thoroughly with a clean cloth.
- Replace the batteries: Once the battery compartment is clean and dry, you can replace the batteries and get back to playing with your toy.
In conclusion, cleaning battery corrosion in toys is a relatively simple process that can be done with a few household ingredients and tools. By following these steps, you can remove the corrosion and get your toys back in working order in no time!
F.A.Q.
What causes battery corrosion in toys?
Battery corrosion occurs when the metal in the battery comes into contact with moisture and other elements in the air. This can cause a chemical reaction that forms a buildup of corrosion on the battery terminals and the battery compartment.
Is cleaning battery corrosion in toys safe?
Cleaning battery corrosion in toys is generally safe if done properly with the right materials and equipment. However, it’s important to take precautions to protect your skin and eyes from the cleaning solution, and to follow the instructions carefully to avoid damaging the toy or other surfaces.
Can I clean battery corrosion with just vinegar or just baking soda?
While vinegar and baking soda can be effective on their own for removing battery corrosion, using a mixture of both is typically more effective. The vinegar helps to dissolve the corrosion, while the baking soda helps to neutralize the acid in the vinegar.
Can I use other cleaning solutions besides vinegar and baking soda to clean battery corrosion?
Yes, there are other cleaning solutions that can be used to remove battery corrosion, including lemon juice, cola, and hydrogen peroxide. However, vinegar and baking soda are commonly used and readily available household items that are effective and safe for use on most toys.
What should I do if the battery corrosion is too severe to remove?
If the battery corrosion is too severe to remove, it may be necessary to replace the battery or the entire toy. In some cases, the battery compartment may be damaged and may not be able to hold new batteries securely. In these cases, it’s best to consult with a professional to determine the best course of action.

Leave a Reply